Visual Basic operates in three modes.
· Design mode - used to build application
· Run mode - used to run the application
· Break mode - application halted and debugger is available
let's focus here on the design mode.
Six windows appear when you start Visual Basic.
· The Main Window consists of the title bar, menu bar, and toolbar. The title bar indicates the project name, the current Visual Basic operating mode, and the current form. The menu bar has drop-down menus from which you control the operation of the Visual Basic environment. The toolbar has buttons that provide shortcuts to some of the menu options. The main window also shows the location of the current form relative to the upper left corner of the screen (measured in twips) and the width and length of the current form.
.
.

· The Form Window is central to developing Visual Basic applications. It is where you draw your application.
.
.

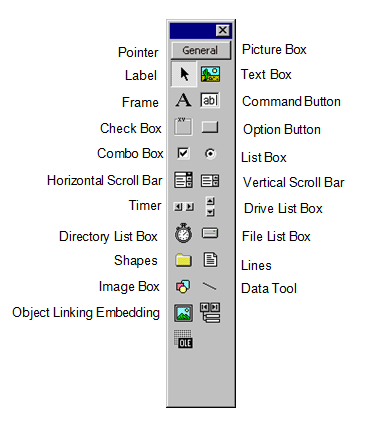
· The Toolbox is the selection menu for controls used in your application.
· available: Alphabetic and Categorized. Under this box are the available properties for the currently selected object.

· The Form Layout Window shows where (upon program execution) your form will be displayed relative to your monitor’s screen:


· The Project Window displays a list of all forms and modules making up your application. You can also obtain a view of the Form or Code windows (window containing the actual Basic coding) from the Project window.
· As mentioned, the user interface is ‘drawn’ in the form window. There are two ways to place controls on a form:
1. Double-click the tool in the toolbox and it is created with a default size on the form. You can then move it or resize it.
2. Click the tool in the toolbox, then move the mouse pointer to the form window. The cursor changes to a crosshair. Place the crosshair at the upper left corner of where you want the control to be, press the left mouse button and hold it down while dragging the cursor toward the lower right corner. When you release the mouse button, the control is drawn.
· To move a control you have drawn, click the object in the form window and drag it to the new location. Release the mouse button.
· To resize a control, click the object so that it is select and sizing handles appear. Use these handles to resize the object.
Each form and control has properties assigned to it by default when you start up a new project. There are two ways to display the properties of an object. The first way is to click on the object (form or control) in the form window. Then, click on the Properties Window or the Properties Window button in the tool bar. The second way is to first click on the Properties Window. Then, select the object from the Object box in the Properties Window. Shown is the Properties Window for the stopwatch application:

The drop-down box at the top of the Properties Window is the Object box. It displays the name of each object in the application as well as its type. This display shows the Form object. The Properties list is directly below this box. In this list, you can scroll through the list of properties for the selected object. You may select a property by clicking on it. Properties can be changed by typing a new value or choosing from a list of predefined settings (available as a drop down list). Properties can be viewed in two ways: Alphabetic and Categorized.
A very important property for each object is its name. The name is used by Visual Basic to refer to a particular object in code.
A convention has been established for naming Visual Basic objects. This convention is to use a three letter prefix (depending on the object) followed by a name you assign. A few of the prefixes are (we’ll see more as we progress in the class):
Object Prefix Example
Form frm frmWatch
Command Button cmd, btn cmdExit, btnStart
Label lbl lblStart, lblEnd
Text Box txt txtTime, txtName
Menu mnu mnuExit, mnuSave
Check box chk chkChoice
Object names can be up to 40 characters long, must start with a letter, must contain only letters, numbers, and the underscore (_) character. Names are used in setting properties at run time and also in establishing procedure names for object events.
.
No comments:
Post a Comment